Art vs. Crafts in Preschool – What’s the Difference?


process art

Process Art


craft not art

Teacher Created Craft Model

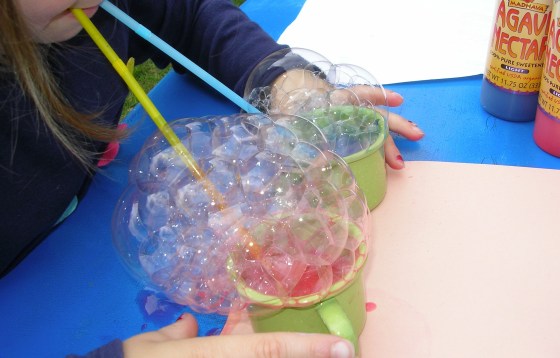
“It’s the process, not the product.”  This important statement is a well-known mantra of early childhood professionals.  Process art is experimenting with a variety of mediums and exploring personal artistic expression for the pure joy and satisfaction of the experience.

The purpose is not to produce a specific art work, but to learn the many ways that materials and colors blend together to make something new and unique.  When it comes to art and young children, process art is the gold standard.

Crafts, however, have an end result in mind.  Using a set of directions, a model, and a few specific materials we hope to make a cute and identifiable craft product that is similar to the original.

You can distinguish easily between the two by assessing how much preparation time the teacher has put into the activity.  Did the teacher print, trace, and cut out components for children to color or glue together while following her preassembled model? Or did the teacher simply gather and provide the objects, paper and art materials needed for the children to sit and begin?  The first is most definitely a craft, while the other is open ended process art.

There’s always a debate raging about this topic, and it exists because learning is always the goal when working with children, and there’s so much more for them to learn and discover when an art experience is open ended.  However, teachers often feel the pressure to send home cute kiddie crafts, as parents seem to really enjoy them.

One problem with prescribed crafts is that they are teacher directed and not child led.  There’s a lack of creativity and critical thinking skills being used by the child, which can result in a lack of engagement or boredom.  Children may view the work as drudgery.  The biggest problem is that children will compare their results to the teacher’s perfect example and be either extremely disappointed or frustrated by their own efforts.  Worse yet, they will feel inferior and believe they are not “good at arts and crafts.” Some children won’t even attempt the activity, believing they can’t do it.  Anyone who has suffered their own Pinterest fails can identify with this emotion.

My perspective on the arts vs. crafts debate is that there is room for both process art and crafts in preschool. I agree that process art should be the main focus (about 75%), but a few crafts sprinkled in (25%) can be beneficial too.

This being said, crafts for children should be chosen carefully and require them to practice the skills they need to learn — tracing, cutting, gluing, etc.  However, this means the craft must be VERY simple with enough open-ended choices to satisfy little artists.  For example, when we worked on paper tube owls last fall, children chose their own earthy-toned paint colors and decided which type and how many feathers to use. The model we followed had only two googly eyes glued on.  I demonstrated how to bend the top edges down to create the look of ears.

SANYO DIGITAL CAMERA

SANYO DIGITAL CAMERA

I can hear the outcry now, “what does a child possibly gain by completing a toilet tube owl?”

If we consider the theory of Multiple Intelligences, we recognize that all children (and adults for that matter) have individual gifts and challenges.  One of my personal joys in teaching young children is discovering their special talents and interests.  We all have something unique that makes us who we are.

While I’ve always admired artistic people and their creations, my own skills are very limited.  Not from lack of trying mind you, but facts are facts.  Maybe I am the product of too many teacher-led crafts in my own youth, but I rarely can come up with an original artistic idea.

However, I love when I see a cute craft project or pattern that I would like to try to duplicate.  As a visual learner, I NEED a photo or actual model to copy.  Often, I need written directions too.  The notion occurred to me one day that maybe, like me, not all children are equipped with the artistic surge to create on their own?  Maybe they needed a little inspiration to see what was possible?  This is when I realized the value of including  some craft projects in my preschool program.  Once children see and experience what can be created with just some paper, glue, and feathers; the door might open to similar ideas and creativity in the future.

What are your thoughts?


Advertisement

March Wind Activities – Preschool

SANYO DIGITAL CAMERA

Using Wind (Air) to Make Bubble Prints

Tell me and I forget.  Teach me and I remember.  Involve me and I learn.

(Benjamin Franklin)

What’s better than a coloring sheet depicting kites and March winds?  Simple activities that let children interact with the power of wind (air).  Set the stage by tapping into prior knowledge by asking, “What is wind?”  Most children will reply that, “it blows.”  They aren’t exactly sure what wind is (air), but soon they’ll find out  with these four simple wind activities to add to units on Weather, Spring, The Month of March, and more.

Outdoor Fun:  Plastic Bag Kites

Nothing illustrates the power of wind like a kite!  A quick and easy plastic bag kite is up and ready to go in minutes and provides so much fun for children.

DSC06766 (2)

Simple Plastic Bag Kite

DSC06861 (2)

Plastic Bag Kites

Supplies:

Plastic grocery bags (check for holes)

String or Yarn (approximately 4-feet long)

Popsicle stick (as handle to wrap string around for easier handling, but not necessary)

Process:

-Gather the bag handles on one side (not the middle) allowing a larger air pocket and tie with yarn/string

-Tie the hanging end of string with a small loop for children to hold onto or tie around a Popsicle stick to create a handle (especially helpful for toddlers/young preschoolers).

Art Experience #1 (Easy, but Fun):  Painting with Air

Supplies:

Tempera Paints

Straws

Small containers for paint or droppers

Process:

-Children use straws to blow paint across paper in different directions.

-Children can experiment with applying paint to paper with small squeeze bottles or with droppers before blowing air through straws.

Note – We found the most successful results with dropping paint from droppers.  Squeezing paints, even from small bottles, produced big puddles of paint with less movement.

Art Experience #2:  Bubble Prints

SANYO DIGITAL CAMERA

Using Wind (Air) to Make Bubble Prints

SANYO DIGITAL CAMERA

Using Wind (Air) to Make Bubble Prints

SANYO DIGITAL CAMERA

Bubble Prints

Process:

-Mix a little bit of tempera paint (shown here) or liquid watercolors  for a more vibrant print into a small container or sturdy cup of half water

-Child blows air through straw into container/cup to make bubbles low or high

-Remove straws from container and lay a heavy piece of white construction or special heavy watercolor paper (more absorbent; keeps it shape) on top of bubble surface. Remove paper, turn over to dry.  Repeat.

Variations:  

-Could use as a color mixing Lesson.  We used red and blue, and where the bubbles overlapped, it turned light purple.  Yellow and Red or Yellow and Blue would create even more pronounced shading.

Indoor Fun (with Math Thrown in):  Cloud Race

Supplies:

Blue Painter’s Tape (to create non-stick lane lines)

Cotton Balls or Pom Poms

Straws

Table surface to use as track

Process:

-Create lines length- wise on a table.

-Place your cotton balls or pom poms on a beginning mark.

-Children blow air through straws to move their cotton ball across the table to the finish line.

-This is a fun and engaging activity that moves quickly as children race to set up the next cotton ball.  They continue to improve upon strategies to maneuver their target to the end.

Variations:  

-Use more than one cotton ball or pom pom.

-Try it blindfolded with a timer, and remove blindfold to see how far the target traveled or have a teacher or friend give one child at a time directions (left/right).

-Have painter’s tape marked with inches to keep track of distance traveled.

-Use this as a game to enhance another unit on spiders (black poms);  lady bugs (red poms); frogs (green poms); and so on.

Paint Scrapers – Rainbow Colors

IMG_0067

Supplies needed:

  • Patterned Paint Scrapers – We loved our sets of four (4) variations of paint scrapers because they were well-made, durable, and washable to be used over and over again.  Each colored scraper was a different pattern, so it was easy for the children to pick and choose.  Frugal Tip:  Parents or teachers of small groups could make their own using cardboard and scissors (patterned or not); but for larger groups or the non handy/crafty teachers like me, these are well worth the purchase.
  • Tempera paints work best for this activity (or small acrylic craft paint bottles for smaller hands)
  • Water color paper is my first choice, as it is absorbent and will highlight the colors
  • Card stock will also work, but create an alternate effect of much of the paint sitting and drying on the surface, adding texture
  •  Tip:  I purchase card stock in advance when on sale at craft stores like Michael’s or JoAnn’s 

IMG_0076

Age/Developmental Levels:

  • Beginner– squirts paint, experiments with paint scrapers (limit number of paint colors (3 maximum) and offer only one type of scraper at first (you can offer more later if child continues interest).  For younger children, use smaller bottles of paint, as they tend to love the squeezing part and end up with too much paint to use effectively.
  • Intermediate– squirts paint, experiments with paint scrapers (offer more paint colors and scraper options)
  • Advanced– squirts paint, experiments with variety of paint scrapers, types of paper, and many paint colors

IMG_0071

Skills/Learning Goals:

  • Fine Motor – squeezing paints, manipulating paint scrapers for different results
  • Science:  Color mixing (using specific colors for desired results), Absorbency of different paper materials
  • Preschool Math – experimenting with patterns

Theme tie-ins Pictured (but limitless):

  • Rainbows (red, orange, yellow, green, blue, purple)
  • Easter, Easter Eggs (pastel shades – we used small bottles of craft acrylic so children could squeeze their own bottles, rather than mixing our Tempera primary colors)

IMG_0114

IMG_0109