My Five Senses – Easy, Engaging Activities

My Five Senses is one of my favorite preschool lessons/themes because the children have so much fun while learning.  I usually like to extend it at least two weeks, so we can focus on one sense at a time, and we always begin with the sense of touch.

Since there are plenty of resources out there for related books andnprintables, this post focuses on a few quick hands-on activities.

Sense of Touch Mystery Bag

DSC09488

Sense of Touch Mystery Bag

Supplies:

-Any type of drawstring bag or pouch (fabric recommended)

-Assorted objects and toys to be identified by the children (at least three items per child for multiple turns and level of difficulty based on the age of the group). Examples from photo above:  puzzle piece, toy dinosaur, straw, spoon, comb, marker, rock, Lego, bean bag, cup, key, toy train, and magnifying glass.

-A blindfold (or individual blindfolds per child)

Note:  We usually play this game during circle time, and children always want to repeat it another day with a new set of objects (plus a few from the first game just to give others a chance to identify them).  It’s a game that can be used throughout the year just for fun after your Five Senses unit is over.

DSC09370

It’s a key!

Process:

-Taking turns, each child is blindfolded and reaches into the bag to pull out an object to identify only with his hands (sense of touch).

-To help solidify the concept of senses, the teacher reminds children that we are only using our hands and sense of touch to guess the object.

Sense of Smell Guessing Game

DSC09485

Sense of Smell Guessing Game

Supplies:

-A set of small plastic jars (my package of 6 were from the Dollar Store)

-Cotton balls

–A set of photo cards that correspond with the scents you will be using (I used Google images, inserted them into a document, printed them, and laminated).  Download a copy of my photo page below:

Five Senses – Sense of Smell Photos

-Assorted spices or scented foods/items you may have at home

Note:  The scents/photos I chose depicted items children would know and be able to identify.  Examples I used:  Italian seasoning blend to match a photo of a pizza; cinnamon/clove to match a photo of a gingerbread man (which we baked earlier in the year); onion powder to match photo of red onions on a salad; vanilla extract to match a photo of vanilla cookie; lemon juice/zest to match a photo of lemonade; and finally a little Dr. Bronner’s peppermint liquid soap (that we use in the classroom) to match the peppermint candy canes.    

-A blindfold (or individual blindfolds per child)

-A tray

Set-Up Process:

-Add small cotton ball (or cut large in half) to insert into jar

-Sprinkle a small amount of spices or scented liquid on cotton ball

-Drip a small amount of hot water over spices, so they will be wet and stay in place to prevent scattering or inhaling once opened.

-Cover and place in refrigerator overnight – take out and place on counter in morning to be at room temperature for your guessing game.

DSC09479 (2)

What does it smell like?

Play Process:

-Explain that you’ll be using only your sense of smell (nose) to guess the items.  Show the children the photo cards and name them to allow them to get a sense of what they will be identifying.

-One child at a time is blindfolded and the teacher shows the other children the photo/scent they will be guessing before opening the container and placing it under the child’s nose. Remind children beforehand not to say the word out loud, although this WILL happen.  We just say, “oops, let’s pick another one,” and remind children again to not give any clues.  We had six different scents, as our group has six children.

-Once each child has had one turn demonstrated by the teacher, you can then ask the children to take turns holding the scented container under a friend’s nose.  Participation by the children helps the waiting factor and increases the fun, as they are excited to help and find out what their friend will guess.

Math Extension:  Graphing favorite and least favorite scents.

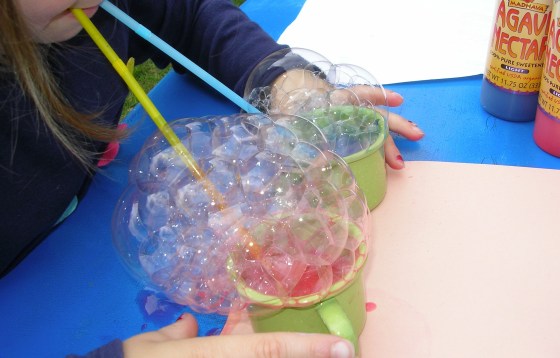
Sense of Taste – Taste Test Experiment

DSC09433

Is it salty, sweet, or sour?

My group of preschoolers get excited about any type of experiment, so that’s what we called this taste test.  We conducted our experiment at our usual snack time.

After reading and talking about taste buds, we all took turns looking through magnfiying glasses at each other’s tongues.  I explained that our taste buds would help us find out which food item would be salty, sweet, or sour.  Can a food be more than one? Let’s find out!

(We skipped bitter, because no child wants to taste unsweetened cocoa powder.)

Supplies:

-A selection of foods (salty, sweet, sour) that are readily available and children would be willing to taste.  We used salty pretzels, sour/salty dill pickles, sour lemon slices, and sweet, raw honey.  (Once the children tasted the samples, they could have more pretzels or pickles for snack.)

-Individual plates for each child with equal portions

DSC09428

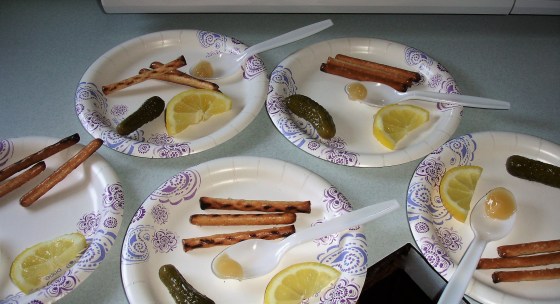
Sense of Taste Experiment – Salty, Sour, and Sweet Foods

Process:

Some children dive right in to taste an item, but others make faces or say, “eww” to new foods.  It is always their choice which items they want to try.  I try to make it fun and exciting by asking who will be the first to try something sour and then ask them which one they think it will be? It continues this way until some items have been tasted and categorized.

Math Extensions:

-Graph for listing favorite tastes = salty, sweet, sour

-Graph for listing which foods fall under the categories of salty, sweet, sour (if you have more than one food choice for each)

Other Quick & Easy Activities

Sense of Hearing:

ear

-Have children take turns sitting with their backs to their classmates (blindfolded)

-One child will be chosen (touch their shoulder) to say “Hello and child’s name”

-The blindfolded child uses only their sense of hearing to guess the classmate

Variation:  Same game, only using a few musical instruments (drum, xylophone, maracas, triangle, etc.)  The blindfolded listener identifies the instrument.

Sense of Sight:

Eye See

-Take turns Playing Pin the Tail on the Donkey (or variations:  Pin the Nose on the Clown/Snowman) with blindfolds.  After child has a blindfolded turn, try it without blindfold to experience the difference sight makes.  Talk about how important your sense of sight is when attempting different tasks.  Try other tasks blindfolded: build a tower with blocks; put a puzzle together; or color a picture.  Also, how does their sense of touch come into play when they can’t see?

-Discuss Braille and blindness during this unit (and after discussing the sense of touch).  Request a book from the library that is written in Braille to allow children to close their eyes and feel the raised letters.


Advertisement

March Wind Activities – Preschool

SANYO DIGITAL CAMERA

Using Wind (Air) to Make Bubble Prints

Tell me and I forget.  Teach me and I remember.  Involve me and I learn.

(Benjamin Franklin)

What’s better than a coloring sheet depicting kites and March winds?  Simple activities that let children interact with the power of wind (air).  Set the stage by tapping into prior knowledge by asking, “What is wind?”  Most children will reply that, “it blows.”  They aren’t exactly sure what wind is (air), but soon they’ll find out  with these four simple wind activities to add to units on Weather, Spring, The Month of March, and more.

Outdoor Fun:  Plastic Bag Kites

Nothing illustrates the power of wind like a kite!  A quick and easy plastic bag kite is up and ready to go in minutes and provides so much fun for children.

DSC06766 (2)

Simple Plastic Bag Kite

DSC06861 (2)

Plastic Bag Kites

Supplies:

Plastic grocery bags (check for holes)

String or Yarn (approximately 4-feet long)

Popsicle stick (as handle to wrap string around for easier handling, but not necessary)

Process:

-Gather the bag handles on one side (not the middle) allowing a larger air pocket and tie with yarn/string

-Tie the hanging end of string with a small loop for children to hold onto or tie around a Popsicle stick to create a handle (especially helpful for toddlers/young preschoolers).

Art Experience #1 (Easy, but Fun):  Painting with Air

Supplies:

Tempera Paints

Straws

Small containers for paint or droppers

Process:

-Children use straws to blow paint across paper in different directions.

-Children can experiment with applying paint to paper with small squeeze bottles or with droppers before blowing air through straws.

Note – We found the most successful results with dropping paint from droppers.  Squeezing paints, even from small bottles, produced big puddles of paint with less movement.

Art Experience #2:  Bubble Prints

SANYO DIGITAL CAMERA

Using Wind (Air) to Make Bubble Prints

SANYO DIGITAL CAMERA

Using Wind (Air) to Make Bubble Prints

SANYO DIGITAL CAMERA

Bubble Prints

Process:

-Mix a little bit of tempera paint (shown here) or liquid watercolors  for a more vibrant print into a small container or sturdy cup of half water

-Child blows air through straw into container/cup to make bubbles low or high

-Remove straws from container and lay a heavy piece of white construction or special heavy watercolor paper (more absorbent; keeps it shape) on top of bubble surface. Remove paper, turn over to dry.  Repeat.

Variations:  

-Could use as a color mixing Lesson.  We used red and blue, and where the bubbles overlapped, it turned light purple.  Yellow and Red or Yellow and Blue would create even more pronounced shading.

Indoor Fun (with Math Thrown in):  Cloud Race

Supplies:

Blue Painter’s Tape (to create non-stick lane lines)

Cotton Balls or Pom Poms

Straws

Table surface to use as track

Process:

-Create lines length- wise on a table.

-Place your cotton balls or pom poms on a beginning mark.

-Children blow air through straws to move their cotton ball across the table to the finish line.

-This is a fun and engaging activity that moves quickly as children race to set up the next cotton ball.  They continue to improve upon strategies to maneuver their target to the end.

Variations:  

-Use more than one cotton ball or pom pom.

-Try it blindfolded with a timer, and remove blindfold to see how far the target traveled or have a teacher or friend give one child at a time directions (left/right).

-Have painter’s tape marked with inches to keep track of distance traveled.

-Use this as a game to enhance another unit on spiders (black poms);  lady bugs (red poms); frogs (green poms); and so on.

Salad Spinner Painting

spin art galaxy 2


Salad spinner painting is such a simple, yet engaging activity for young children. You don’t need any special materials or major preparation.  Children practice many important skills, and have fun while doing it!

You can tie this activity in with many different themes, depending on the colors and shapes used (Easter eggs, Valentine  hearts, 4th of July, snowflakes, etc.).  Photos on this page are from our Space and St. Patrick’s Day themes.  I wanted to tie-in color mixing the first time we tried this; which explains why we used red, blue, and yellow paint for shamrocks!  We can’t wait to try it for Earth Day using shades of greens and blues.

Supplies needed:

  • Salad spinner – Ikea has an inexpensive option that works well, but we used an older one we had on hand
  • Tempera paints or any other types you want to use up
  • Children’s Scissors
  • Card stock is best for this project (heavier/firm weight plus absorbent)  Tip:  I purchase in advance when on sale at craft stores like Michael’s or JoAnn’s.  Recycled Materials:  Old file folders can be used in place of card stock
  • or Water color paper

spin art galaxy 3

spin art galaxy


Age/Developmental Levels:

  • Beginner – Adds shape to spinner, squirts paint, spins handle
  • Intermediate – child cuts out traced shape, adds to spinner, squirts paint, spins handle
  • Advanced – Child traces and cuts out own shapes , adds to spinner, squirts paint, spins handle

Skills/Learning Goals:

  • Fine/Gross Motor – large arm movements – squeezing paints, turning spinner handle, tracing and cutting out shapes
  • Science:  Awareness/Experimentation with centrifugal force and color mixing (if desired)

Theme tie-ins (endless):

  • Shamrocks, St. Patrick’s Day
  • Space, Solar System, Galaxy, Planets
  • Earth Day
  • Snowflakes, Winter
  • Hearts, Valentine’s Day
  • Easter, Easter Eggs

spin art shamrock2


spin art shamrock

Affiliate links to products appear in supply lists as a convenience to readers trying to locate items.  If items are purchased through these links, they may provide a small commission to this blog at no additional cost to buyer.  Thank you!


Paint Scrapers – Rainbow Colors

IMG_0067

Supplies needed:

  • Patterned Paint Scrapers – We loved our sets of four (4) variations of paint scrapers because they were well-made, durable, and washable to be used over and over again.  Each colored scraper was a different pattern, so it was easy for the children to pick and choose.  Frugal Tip:  Parents or teachers of small groups could make their own using cardboard and scissors (patterned or not); but for larger groups or the non handy/crafty teachers like me, these are well worth the purchase.
  • Tempera paints work best for this activity (or small acrylic craft paint bottles for smaller hands)
  • Water color paper is my first choice, as it is absorbent and will highlight the colors
  • Card stock will also work, but create an alternate effect of much of the paint sitting and drying on the surface, adding texture
  •  Tip:  I purchase card stock in advance when on sale at craft stores like Michael’s or JoAnn’s 

IMG_0076

Age/Developmental Levels:

  • Beginner– squirts paint, experiments with paint scrapers (limit number of paint colors (3 maximum) and offer only one type of scraper at first (you can offer more later if child continues interest).  For younger children, use smaller bottles of paint, as they tend to love the squeezing part and end up with too much paint to use effectively.
  • Intermediate– squirts paint, experiments with paint scrapers (offer more paint colors and scraper options)
  • Advanced– squirts paint, experiments with variety of paint scrapers, types of paper, and many paint colors

IMG_0071

Skills/Learning Goals:

  • Fine Motor – squeezing paints, manipulating paint scrapers for different results
  • Science:  Color mixing (using specific colors for desired results), Absorbency of different paper materials
  • Preschool Math – experimenting with patterns

Theme tie-ins Pictured (but limitless):

  • Rainbows (red, orange, yellow, green, blue, purple)
  • Easter, Easter Eggs (pastel shades – we used small bottles of craft acrylic so children could squeeze their own bottles, rather than mixing our Tempera primary colors)

IMG_0114

IMG_0109