Adding Layers* to Your Preschool Theme: Using YouTube

youtube


Many of my preschoolers love music and really absorb the rhythms and messages of various songs.  However, other than a circle time song or flannel board activity, I am NOT a singer, nor am I musically inclined.  Using Youtube helps me provide some fun and educational music that children enjoy.

For each weekly preschool topic, I create a 15-20 minute YouTube playlist (link to playlists at end of post).  My playlist format usually consists of a letter of the week; a short educational video and song or two about our topic; along with a general song clip to reinforce the alphabet, counting, or shapes that we are working on.

Some clips will reappear throughout the year, such as the Months of the Year song or The Seasons song.  As the weeks go on, I also take one or two video clips from the previous week’s playlist and add it to the current week for transition purposes and to build upon what we previously learned.

Not all children enjoy videos or songs, so 15 minutes is about all they can handle before getting restless.  We do not have a TV at school, since children get plenty of screen time at home. Instead,  I use my laptop computer for this short period of time, positioned on a chair across from the lunch table.

Regulations don’t allow viewing while eating; so I turn it on during our lunch time preparations — as I am warming up items, cutting skins off apples, etc.  Lunch occurs right after our group circle time and before heading outside for parent pick-ups, so the children are ready to take a break from me and my voice.

My playlists are always evolving as new children with different interests and aptitudes enter my program, but they will give you a starting point to create your own.

I try to remove those clips that weren’t popular or well received, which is easy to distinguish, as children will be distracted or talk over the video.  To me, that is a fail.  If they are quiet and engaged or singing along quietly, then you know you have a winner.

You can view and use my playlists here or copy them for your own channel and mix and match up your own:

Darlene Gormly’s YouTube Created Playlists

*Adding layers to your theme is a process of expanding into each area of your classroom and providing activities and materials that enhance the depth of knowledge and understanding of the topic.


Advertisement

Art vs. Crafts in Preschool – What’s the Difference?


process art

Process Art


craft not art

Teacher Created Craft Model

“It’s the process, not the product.”  This important statement is a well-known mantra of early childhood professionals.  Process art is experimenting with a variety of mediums and exploring personal artistic expression for the pure joy and satisfaction of the experience.

The purpose is not to produce a specific art work, but to learn the many ways that materials and colors blend together to make something new and unique.  When it comes to art and young children, process art is the gold standard.

Crafts, however, have an end result in mind.  Using a set of directions, a model, and a few specific materials we hope to make a cute and identifiable craft product that is similar to the original.

You can distinguish easily between the two by assessing how much preparation time the teacher has put into the activity.  Did the teacher print, trace, and cut out components for children to color or glue together while following her preassembled model? Or did the teacher simply gather and provide the objects, paper and art materials needed for the children to sit and begin?  The first is most definitely a craft, while the other is open ended process art.

There’s always a debate raging about this topic, and it exists because learning is always the goal when working with children, and there’s so much more for them to learn and discover when an art experience is open ended.  However, teachers often feel the pressure to send home cute kiddie crafts, as parents seem to really enjoy them.

One problem with prescribed crafts is that they are teacher directed and not child led.  There’s a lack of creativity and critical thinking skills being used by the child, which can result in a lack of engagement or boredom.  Children may view the work as drudgery.  The biggest problem is that children will compare their results to the teacher’s perfect example and be either extremely disappointed or frustrated by their own efforts.  Worse yet, they will feel inferior and believe they are not “good at arts and crafts.” Some children won’t even attempt the activity, believing they can’t do it.  Anyone who has suffered their own Pinterest fails can identify with this emotion.

My perspective on the arts vs. crafts debate is that there is room for both process art and crafts in preschool. I agree that process art should be the main focus (about 75%), but a few crafts sprinkled in (25%) can be beneficial too.

This being said, crafts for children should be chosen carefully and require them to practice the skills they need to learn — tracing, cutting, gluing, etc.  However, this means the craft must be VERY simple with enough open-ended choices to satisfy little artists.  For example, when we worked on paper tube owls last fall, children chose their own earthy-toned paint colors and decided which type and how many feathers to use. The model we followed had only two googly eyes glued on.  I demonstrated how to bend the top edges down to create the look of ears.

SANYO DIGITAL CAMERA

SANYO DIGITAL CAMERA

I can hear the outcry now, “what does a child possibly gain by completing a toilet tube owl?”

If we consider the theory of Multiple Intelligences, we recognize that all children (and adults for that matter) have individual gifts and challenges.  One of my personal joys in teaching young children is discovering their special talents and interests.  We all have something unique that makes us who we are.

While I’ve always admired artistic people and their creations, my own skills are very limited.  Not from lack of trying mind you, but facts are facts.  Maybe I am the product of too many teacher-led crafts in my own youth, but I rarely can come up with an original artistic idea.

However, I love when I see a cute craft project or pattern that I would like to try to duplicate.  As a visual learner, I NEED a photo or actual model to copy.  Often, I need written directions too.  The notion occurred to me one day that maybe, like me, not all children are equipped with the artistic surge to create on their own?  Maybe they needed a little inspiration to see what was possible?  This is when I realized the value of including  some craft projects in my preschool program.  Once children see and experience what can be created with just some paper, glue, and feathers; the door might open to similar ideas and creativity in the future.

What are your thoughts?


How to Start a Home Daycare – Part I

IMG_1463

Providing child care in your home can be a part-time or full-time business.  You can be licensed or unlicensed.  You may have a degree in early childhood education or have experience as a mother or babysitter.  How do you get started?  Here are some answers to your questions:

Do I have to get a license to care for children in my home?

-This varies significantly from state to state.  Most states allow you to care for a certain number of children in your home (that are not your own) before requiring you to obtain a license.  To find information specific to your state, initiate a search for child care licensing.  In my state of Rhode Island, DCYF (RI Department of Children and Families) is the place to start.  You can visit your state’s website or call to speak to someone.  Terminology varies, but in RI, we are called Family Child Care Homes.  Regulations for daycare centers in commercial locations are much stricter than those for Child Care Homes.  Licensing for child care homes take into consideration that your home serves a dual purpose of providing shelter for your own family as well.

-Usually, there will be some type of informational meeting or orientation you can sign up to attend.  This will give you the basic information you need to decide if starting a family child care home is for you.  Some states will offer required training.  In RI, we took a 13-week course covering everything from literacy in early childhood programs to how to report suspected child abuse.  If you have a background in early childhood education, much of this information will be familiar, however, you’ll benefit from the contacts and unexpected friendships that you’ll make.  If you are new to providing child care, these classes will be a very beneficial introduction to the field of early education.

taxes

If I don’t have a license, can I still claim my earnings and take advantage of business tax deductions?

Surprisingly, yes you can.  You would list your occupation as childcare provider on your tax forms.  You can claim money received and legally deduct supplies and equipment purchased to provide care.  You may also claim a partial amount of regular home expenses related to having a business in your home:  mortgage or rent, utilities, and some home repairs for example.  For more information on taxes and other financial topics related to child care businesses , visit this expert’s blog:  Tom Copeland’s Taking Care of Business.

What are the advantages of being licensed to care for children in my home?

Other than increasing the number of children you can legally care for in your home, being a licensed child care home allows you to receive state funds for eligible children. You would be listed as a licensed provider with your state’s licensing department, and parents (including foster parents) who receive subsidies to help them pay for daycare costs would be able to enroll their children in your program and have the state pay you directly.  This could increase the pool of families who would use your services.

As a licensed childcare provider, you would also be eligible for the USDA’s Food Program, which will reimburse you for nutritious food served to the children in your program. There are also pros and cons to this program and not all providers choose to join.  There are strict guidelines and meal limits, which might not fit in with your personal philosophies.  To learn more about this program, go to:  USDA Food Program

Licensed providers may have access to more resources than unlicensed providers. Some of the resources include:  being eligible to apply for state grants, which can provide funds for educational materials and equipment; being able to participate in the state’s rating system for child care homes (an example in RI:  Bright Stars); and being able to join a professional organization of other licensed providers in your state to receive training and support (an example here in RI:  Family Child Care Homes of RI).

Once you find out the basic requirements and regulations in your state pertaining to owning and operating a home child care business, you will be ready to start planning for your business.

If you have specific questions related to this first phase of deciding to become a home childcare provider, please ask and I’ll do my best to provide an answer for you!  

March Wind Activities – Preschool

SANYO DIGITAL CAMERA

Using Wind (Air) to Make Bubble Prints

Tell me and I forget.  Teach me and I remember.  Involve me and I learn.

(Benjamin Franklin)

What’s better than a coloring sheet depicting kites and March winds?  Simple activities that let children interact with the power of wind (air).  Set the stage by tapping into prior knowledge by asking, “What is wind?”  Most children will reply that, “it blows.”  They aren’t exactly sure what wind is (air), but soon they’ll find out  with these four simple wind activities to add to units on Weather, Spring, The Month of March, and more.

Outdoor Fun:  Plastic Bag Kites

Nothing illustrates the power of wind like a kite!  A quick and easy plastic bag kite is up and ready to go in minutes and provides so much fun for children.

DSC06766 (2)

Simple Plastic Bag Kite

DSC06861 (2)

Plastic Bag Kites

Supplies:

Plastic grocery bags (check for holes)

String or Yarn (approximately 4-feet long)

Popsicle stick (as handle to wrap string around for easier handling, but not necessary)

Process:

-Gather the bag handles on one side (not the middle) allowing a larger air pocket and tie with yarn/string

-Tie the hanging end of string with a small loop for children to hold onto or tie around a Popsicle stick to create a handle (especially helpful for toddlers/young preschoolers).

Art Experience #1 (Easy, but Fun):  Painting with Air

Supplies:

Tempera Paints

Straws

Small containers for paint or droppers

Process:

-Children use straws to blow paint across paper in different directions.

-Children can experiment with applying paint to paper with small squeeze bottles or with droppers before blowing air through straws.

Note – We found the most successful results with dropping paint from droppers.  Squeezing paints, even from small bottles, produced big puddles of paint with less movement.

Art Experience #2:  Bubble Prints

SANYO DIGITAL CAMERA

Using Wind (Air) to Make Bubble Prints

SANYO DIGITAL CAMERA

Using Wind (Air) to Make Bubble Prints

SANYO DIGITAL CAMERA

Bubble Prints

Process:

-Mix a little bit of tempera paint (shown here) or liquid watercolors  for a more vibrant print into a small container or sturdy cup of half water

-Child blows air through straw into container/cup to make bubbles low or high

-Remove straws from container and lay a heavy piece of white construction or special heavy watercolor paper (more absorbent; keeps it shape) on top of bubble surface. Remove paper, turn over to dry.  Repeat.

Variations:  

-Could use as a color mixing Lesson.  We used red and blue, and where the bubbles overlapped, it turned light purple.  Yellow and Red or Yellow and Blue would create even more pronounced shading.

Indoor Fun (with Math Thrown in):  Cloud Race

Supplies:

Blue Painter’s Tape (to create non-stick lane lines)

Cotton Balls or Pom Poms

Straws

Table surface to use as track

Process:

-Create lines length- wise on a table.

-Place your cotton balls or pom poms on a beginning mark.

-Children blow air through straws to move their cotton ball across the table to the finish line.

-This is a fun and engaging activity that moves quickly as children race to set up the next cotton ball.  They continue to improve upon strategies to maneuver their target to the end.

Variations:  

-Use more than one cotton ball or pom pom.

-Try it blindfolded with a timer, and remove blindfold to see how far the target traveled or have a teacher or friend give one child at a time directions (left/right).

-Have painter’s tape marked with inches to keep track of distance traveled.

-Use this as a game to enhance another unit on spiders (black poms);  lady bugs (red poms); frogs (green poms); and so on.

Penguins

penguin2

Penguins are such an engaging topic for young children that they can be presented as a sole theme or as part of a unit on polar animals.

When presenting science/nature topics to children, I try to focus on a few main facts that will stick with the children or ignite an interest to explore more in the future.   I like to think that one day in elementary school, a subject will trigger a little memory of something they first learned with me in preschool.

Three Simple Facts to focus on:

–Emperor Penguins

Why?  They are unique and interesting to children because of  1) their size and 2) the fact that the father penguins are in charge of caring for their eggs/chicks while the mothers swim off for weeks at a time in search of food.

–North Pole vs. South Pole

Why?  A great way to introduce a globe and vocabulary words of locations like Arctic (North Pole) and Antartica (South Pole) and directional/positional words like Up/Down and Top/Bottom.

One of my favorite facts to share with little ones is that many of our favorite, well-known polar animals (polar bear, walrus, seals, beluga whales, Arctic fox, etc.) all live together at the North Pole (Arctic), but many our penguin friends live at the South Pole (Antartic).

A question to ask:  Why can’t penguins play with polar bears?  You’ll get many answers, such as polar bears would bite/eat the penguins (probably true), but it allows you to illustrate with your globe that polar bears live way at the very top of the world (North Pole), and penguins live way at the very bottom of the world (South Pole).  It is definitely a fact that clicks with children and stays with them.

–Penguins are Birds (but can’t fly)

Why?  Introduction to common bird traits — wings (but can’t fly), lay eggs, and they feed their babies through regurgitation (a wonderful vocabulary word that brings lots of “ewwwws”).

Three Favorite learning activities that leave an impression:

1.  Math:  Measure/Compare children’s size/height with life-size Emperor Penguin and/or average penguin.

emperor penguin

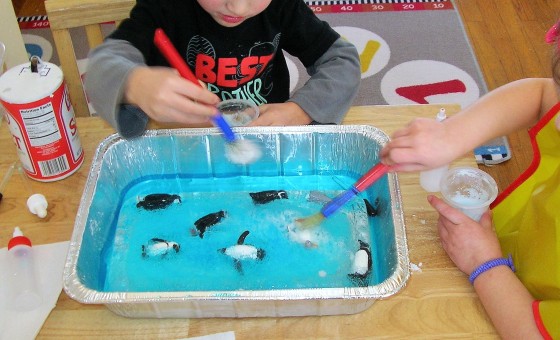
2:  Science:  RESCUE THE PENGUINS!   from an iceberg (individual icebergs or group cooperative activity) using salt, salt water and friction (paint brushes) to melt the ice.   Wrapping Up the Activity:  Some children will work a long time on this project (45 minutes or more), while others may drop out after 15 or 20 minutes, but often will circle back to the activity.  If it is time to wrap up the activity due to time constraints, and the penguins are half-exposed from the ice: the teacher may ask children what else they should try OR “think out loud” that maybe warm water will melt the ice faster.  Pouring a bit of hot water from the tap will usually release the individual penguins and satisfy those who worked so diligently.


penguins

Individual Icebergs (frozen in cups, inverted in bowls to catch liquid)

SANYO DIGITAL CAMERA

Group Activity – Free the Penguins

SANYO DIGITAL CAMERA

Group Activity – Free the Penguins

SANYO DIGITAL CAMERA

Group Activity – Penguins in a Block of Ice

Process:

-Freeze penguin figures in individual plastic cups or large container overnight using food coloring or Liquid Watercolors to tint water.  Remove a few minutes before using to allow ice mold to release.  Large Classrooms:  this activity can be placed in your sensory table to allow different groups at a time work on this project over the course of the day.

-Provide salt, cups, droppers, mini squeeze bottles, and paint brushes as tools to help release the penguins.  For larger group project, we used spoons toward the end to help chisel the penguins out.  We did not use spoons for individual projects, as there would be less science involved and more whacking at the ice, possibly sending everything flying.

Supplies needed:

3. Sensory / Loose Parts / Dramatic Play

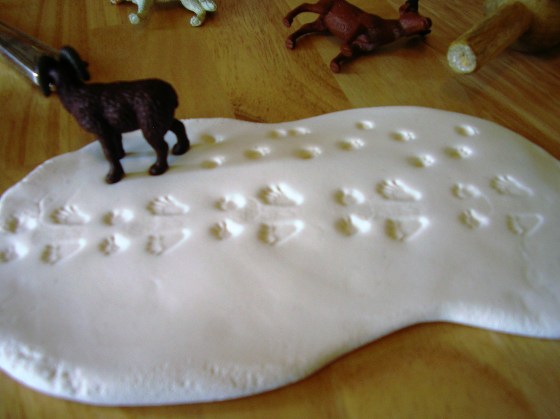
Crayola Model Magic is a different kind of dough experience.  When fresh out of the package, it is light and somewhat stiff.  It can be pulled apart in chunks.  Once warmed, it is pliable and can be stretched for fun.  In this invitation to play, children use the Model Magic as snow, floating icebergs, and caves for penguins and/or polar animals.  Gems are added for interest and often result in bodies of water for the animals.  Little footprints are left in the dough as the animals move about.

DSC03018

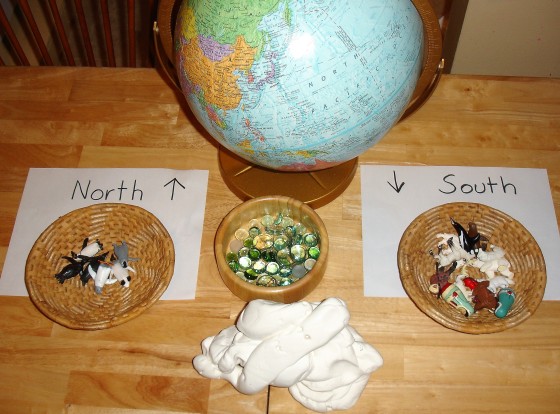
Crayola Model Magic Dough, Gems, Polar Animals and Globe

polar animals and snow dough

Creating Caves and Floating Icebergs with Polar Animals (Although penguins and other animals live on separate poles, children are immersed in their own play.)

Supplies needed:

  • Crayola Model Magic (white) –  *Frugal Tip:  can often be found at Michael’s or JoAnn Fabrics.  You may find them on sale occasionally, but for best savings use a 50% off or other coupon off the full price.  
  • Toob of Penguins and/or Polar Animal figures *see Frugal Tip above
  • Gems or other ice-like loose parts

Learning Goals:

  • Science:  Awareness/Experimentation of liquids/solids (water can be both); the affect of warmth/heat (temperature) on ice; making predictions
  • Math:  Size comparisons/measurement
  • Geography:  Pole locations and Continents

Theme extenders and tie-ins:

  • Polar Animals
  • Winter
  • Continents

Updated Post:  2/8/19

Books Used with these Activities:

book peng

book emp


Affiliate links to products appear in supply lists as a convenience to readers trying to locate items.  If items are purchased through these links, they may provide a small commission to this blog at no additional cost to buyer.  Thank you!

Animal Tracks (in the Snow)

Here in Rhode Island we have pretty snowy winters, so this is my variation on the themes of Forest Animals and Animal Tracks that other schools might introduce in the muddy season of spring.  The day after a fresh fallen snow, my small suburban backyard is covered in tracks; birds, squirrels, rabbits, and possibly a neighborhood cat or other animal.  Young children often wouldn’t even notice these everyday happenings if not for introducing the topic of animal tracks.  Examples from my backyard:

My approach to teaching young children is not to try to cram in all the possible information or projects I can surrounding each topic, but to choose a few basics that will leave a lasting impression and possibly spark an interest in learning more in the future.  At the very least, I hope that when they visit these subjects again in elementary school, they will remember a little bit about what they learned in preschool.

A favorite hands-on activity:  

Tracks in the Snow

SANYO DIGITAL CAMERA

Supplies Needed:

  • Safari brand Toob Animals (we used North American Animals and also used some Arctic Animals later)
  • Crayola Model Magic – White                                                                                            Frugal Tip:  Wait for a 40-50% discount coupon to Michael’s or other craft store to purchase a large tub at a discount, rather than individual packages.  For about $12.50, you’ll get about 5 packages in the tub.   This also works for the Safari brand Toobs, although they occasionally go on sale for half price.

Options – you can also use any type of homemade or store bought play dough you have on hand.  However, I love to introduce this type of dough during the winter months.  It has a different, light-weight texture and really holds the animals’ footprints and shows them in more detail than a softer dough.  Because Model Magic can be allowed to dry, we often use it for Christmas ornament projects and for making homemade snowmen to take home.  It does get drier each time you use it, even if you store it carefully, so it is a one time per year purchase and seasonal experience for my students.  

Some of my favorite books for this theme:

Affiliate links to products appear in supply lists as a convenience to readers trying to locate items.  If items are purchased through these links, they may provide a small commission to this blog at no additional cost to buyer.  Thank you!

How Ebates Saves Me Money on Preschool Supplies

ebates

Promotion:  (Ebates is currently offering new members $10 toward their first purchase through March 31, 2107 and will reward me as well, if you use the links provided whenever you click on Ebates throughout this article).  

Most of us know the usual ways to find less expensive preschool toys and equipment:  local yard sales, thrift stores, Craig’s List, and waiting for store sales; but there is one habit I have acquired that has saved me over $600 in the last five years.  This $600 was returned to me in the form of rebates (Ebates) by check or directly deposited into my Paypal account.  This rebate was in addition to shopping for sale items AND using coupon codes for money off my purchases — I ALWAYS search for coupon codes first.

I make ALL online and some big box store purchases using Ebates, as they offer a percentage off your purchase at hundreds of retailers, including many of my favorites: Discount School Supply; Kohl’s (for great sales on Melissa & Doug toys); Walmart; Home Depot and Lowe’s; and on and on.

Ebates does this by providing a link to the store and keeps track of your purchase and rebate amount, which is sent by check or through Paypal each quarter.

Big Purchase Tip:  I often will order a large item (lawnmower, shelving, etc.) online from a retailer like Home Depot or large toy purchase (Little Tykes) from Walmart and choose to pick it up at the store, because I can get more of a discount using Ebates than I could if I just went shopping in person.

It’s so easy to use once you sign up, and there’s no hassle or commitment. I can’t imagine not using it, as every little amount adds up to savings!   Usually you just start every purchase at Ebates.com, search for your store, check out the coupons they may have available (I also always search for my own coupon codes first).  Also, throughout the year you can earn double rebates during special sale months around the holidays.

Time Saver:  Now there’s an Ebates  Cash Back Button, which can sit near your browser (similar to a button that Pinterest also offers).  If you are browsing online and Ebates recognizes a retailer, the button will flash to alert you to save money through Ebates.

Any questions?  Need help?  Let me know!


Salad Spinner Painting

spin art galaxy 2


Salad spinner painting is such a simple, yet engaging activity for young children. You don’t need any special materials or major preparation.  Children practice many important skills, and have fun while doing it!

You can tie this activity in with many different themes, depending on the colors and shapes used (Easter eggs, Valentine  hearts, 4th of July, snowflakes, etc.).  Photos on this page are from our Space and St. Patrick’s Day themes.  I wanted to tie-in color mixing the first time we tried this; which explains why we used red, blue, and yellow paint for shamrocks!  We can’t wait to try it for Earth Day using shades of greens and blues.

Supplies needed:

  • Salad spinner – Ikea has an inexpensive option that works well, but we used an older one we had on hand
  • Tempera paints or any other types you want to use up
  • Children’s Scissors
  • Card stock is best for this project (heavier/firm weight plus absorbent)  Tip:  I purchase in advance when on sale at craft stores like Michael’s or JoAnn’s.  Recycled Materials:  Old file folders can be used in place of card stock
  • or Water color paper

spin art galaxy 3

spin art galaxy


Age/Developmental Levels:

  • Beginner – Adds shape to spinner, squirts paint, spins handle
  • Intermediate – child cuts out traced shape, adds to spinner, squirts paint, spins handle
  • Advanced – Child traces and cuts out own shapes , adds to spinner, squirts paint, spins handle

Skills/Learning Goals:

  • Fine/Gross Motor – large arm movements – squeezing paints, turning spinner handle, tracing and cutting out shapes
  • Science:  Awareness/Experimentation with centrifugal force and color mixing (if desired)

Theme tie-ins (endless):

  • Shamrocks, St. Patrick’s Day
  • Space, Solar System, Galaxy, Planets
  • Earth Day
  • Snowflakes, Winter
  • Hearts, Valentine’s Day
  • Easter, Easter Eggs

spin art shamrock2


spin art shamrock

Affiliate links to products appear in supply lists as a convenience to readers trying to locate items.  If items are purchased through these links, they may provide a small commission to this blog at no additional cost to buyer.  Thank you!


Paint Scrapers – Rainbow Colors

IMG_0067

Supplies needed:

  • Patterned Paint Scrapers – We loved our sets of four (4) variations of paint scrapers because they were well-made, durable, and washable to be used over and over again.  Each colored scraper was a different pattern, so it was easy for the children to pick and choose.  Frugal Tip:  Parents or teachers of small groups could make their own using cardboard and scissors (patterned or not); but for larger groups or the non handy/crafty teachers like me, these are well worth the purchase.
  • Tempera paints work best for this activity (or small acrylic craft paint bottles for smaller hands)
  • Water color paper is my first choice, as it is absorbent and will highlight the colors
  • Card stock will also work, but create an alternate effect of much of the paint sitting and drying on the surface, adding texture
  •  Tip:  I purchase card stock in advance when on sale at craft stores like Michael’s or JoAnn’s 

IMG_0076

Age/Developmental Levels:

  • Beginner– squirts paint, experiments with paint scrapers (limit number of paint colors (3 maximum) and offer only one type of scraper at first (you can offer more later if child continues interest).  For younger children, use smaller bottles of paint, as they tend to love the squeezing part and end up with too much paint to use effectively.
  • Intermediate– squirts paint, experiments with paint scrapers (offer more paint colors and scraper options)
  • Advanced– squirts paint, experiments with variety of paint scrapers, types of paper, and many paint colors

IMG_0071

Skills/Learning Goals:

  • Fine Motor – squeezing paints, manipulating paint scrapers for different results
  • Science:  Color mixing (using specific colors for desired results), Absorbency of different paper materials
  • Preschool Math – experimenting with patterns

Theme tie-ins Pictured (but limitless):

  • Rainbows (red, orange, yellow, green, blue, purple)
  • Easter, Easter Eggs (pastel shades – we used small bottles of craft acrylic so children could squeeze their own bottles, rather than mixing our Tempera primary colors)

IMG_0114

IMG_0109