March Wind Activities – Preschool

SANYO DIGITAL CAMERA

Using Wind (Air) to Make Bubble Prints

Tell me and I forget.  Teach me and I remember.  Involve me and I learn.

(Benjamin Franklin)

What’s better than a coloring sheet depicting kites and March winds?  Simple activities that let children interact with the power of wind (air).  Set the stage by tapping into prior knowledge by asking, “What is wind?”  Most children will reply that, “it blows.”  They aren’t exactly sure what wind is (air), but soon they’ll find out  with these four simple wind activities to add to units on Weather, Spring, The Month of March, and more.

Outdoor Fun:  Plastic Bag Kites

Nothing illustrates the power of wind like a kite!  A quick and easy plastic bag kite is up and ready to go in minutes and provides so much fun for children.

DSC06766 (2)

Simple Plastic Bag Kite

DSC06861 (2)

Plastic Bag Kites

Supplies:

Plastic grocery bags (check for holes)

String or Yarn (approximately 4-feet long)

Popsicle stick (as handle to wrap string around for easier handling, but not necessary)

Process:

-Gather the bag handles on one side (not the middle) allowing a larger air pocket and tie with yarn/string

-Tie the hanging end of string with a small loop for children to hold onto or tie around a Popsicle stick to create a handle (especially helpful for toddlers/young preschoolers).

Art Experience #1 (Easy, but Fun):  Painting with Air

Supplies:

Tempera Paints

Straws

Small containers for paint or droppers

Process:

-Children use straws to blow paint across paper in different directions.

-Children can experiment with applying paint to paper with small squeeze bottles or with droppers before blowing air through straws.

Note – We found the most successful results with dropping paint from droppers.  Squeezing paints, even from small bottles, produced big puddles of paint with less movement.

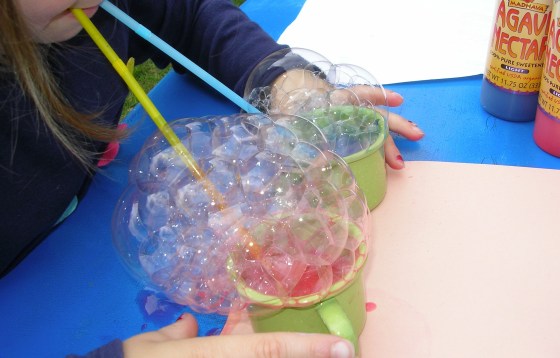
Art Experience #2:  Bubble Prints

SANYO DIGITAL CAMERA

Using Wind (Air) to Make Bubble Prints

SANYO DIGITAL CAMERA

Using Wind (Air) to Make Bubble Prints

SANYO DIGITAL CAMERA

Bubble Prints

Process:

-Mix a little bit of tempera paint (shown here) or liquid watercolors  for a more vibrant print into a small container or sturdy cup of half water

-Child blows air through straw into container/cup to make bubbles low or high

-Remove straws from container and lay a heavy piece of white construction or special heavy watercolor paper (more absorbent; keeps it shape) on top of bubble surface. Remove paper, turn over to dry.  Repeat.

Variations:  

-Could use as a color mixing Lesson.  We used red and blue, and where the bubbles overlapped, it turned light purple.  Yellow and Red or Yellow and Blue would create even more pronounced shading.

Indoor Fun (with Math Thrown in):  Cloud Race

Supplies:

Blue Painter’s Tape (to create non-stick lane lines)

Cotton Balls or Pom Poms

Straws

Table surface to use as track

Process:

-Create lines length- wise on a table.

-Place your cotton balls or pom poms on a beginning mark.

-Children blow air through straws to move their cotton ball across the table to the finish line.

-This is a fun and engaging activity that moves quickly as children race to set up the next cotton ball.  They continue to improve upon strategies to maneuver their target to the end.

Variations:  

-Use more than one cotton ball or pom pom.

-Try it blindfolded with a timer, and remove blindfold to see how far the target traveled or have a teacher or friend give one child at a time directions (left/right).

-Have painter’s tape marked with inches to keep track of distance traveled.

-Use this as a game to enhance another unit on spiders (black poms);  lady bugs (red poms); frogs (green poms); and so on.

Advertisement

Salad Spinner Painting

spin art galaxy 2


Salad spinner painting is such a simple, yet engaging activity for young children. You don’t need any special materials or major preparation.  Children practice many important skills, and have fun while doing it!

You can tie this activity in with many different themes, depending on the colors and shapes used (Easter eggs, Valentine  hearts, 4th of July, snowflakes, etc.).  Photos on this page are from our Space and St. Patrick’s Day themes.  I wanted to tie-in color mixing the first time we tried this; which explains why we used red, blue, and yellow paint for shamrocks!  We can’t wait to try it for Earth Day using shades of greens and blues.

Supplies needed:

  • Salad spinner – Ikea has an inexpensive option that works well, but we used an older one we had on hand
  • Tempera paints or any other types you want to use up
  • Children’s Scissors
  • Card stock is best for this project (heavier/firm weight plus absorbent)  Tip:  I purchase in advance when on sale at craft stores like Michael’s or JoAnn’s.  Recycled Materials:  Old file folders can be used in place of card stock
  • or Water color paper

spin art galaxy 3

spin art galaxy


Age/Developmental Levels:

  • Beginner – Adds shape to spinner, squirts paint, spins handle
  • Intermediate – child cuts out traced shape, adds to spinner, squirts paint, spins handle
  • Advanced – Child traces and cuts out own shapes , adds to spinner, squirts paint, spins handle

Skills/Learning Goals:

  • Fine/Gross Motor – large arm movements – squeezing paints, turning spinner handle, tracing and cutting out shapes
  • Science:  Awareness/Experimentation with centrifugal force and color mixing (if desired)

Theme tie-ins (endless):

  • Shamrocks, St. Patrick’s Day
  • Space, Solar System, Galaxy, Planets
  • Earth Day
  • Snowflakes, Winter
  • Hearts, Valentine’s Day
  • Easter, Easter Eggs

spin art shamrock2


spin art shamrock

Affiliate links to products appear in supply lists as a convenience to readers trying to locate items.  If items are purchased through these links, they may provide a small commission to this blog at no additional cost to buyer.  Thank you!


Best Preschool Egg Hunt

IMG_0293

The best egg hunt for preschoolers is one that is simply fun with no fighting, complaining, or disappointments.  Ways to accomplish this perfect egg hunt?

  1. Limit the amount of eggs per child
  2. Each child searches for an assigned color
  3. Do not fill the eggs
  4. Let children turn in their eggs for a treat bag

I’ve tried all types of egg hunts, this has been my favorite for four year straight. The children are excited, happy, and content! What more can you ask for?

Why does it work so well?

  1.  Assigned colors (chosen or randomly picked) give children a mission and a focus.  It eliminates that overwhelming feeling of having to grab every  egg they see.
  2. Limiting the number (we do 10) allows children to search just long enough that it doesn’t become boring or exhausting.  It also encourages them to stop every so often to count how many eggs they have and how many they still need to find.  (As a teacher, this is one of my favorite parts — counting practice that is initiated by  children).
  3. Empty eggs – egg finding is the goal, not stopping to check each egg and being excited/disappointed with contents or the fact that you are not finding the same types of fillings as the other children.  Empty eggs are also fun to hide again for each other once all 10 have been found.  In my experience, the children invent their own games to play with the empty eggs and often ask to take their eggs home.
  4. When all the eggs have been found (and outside play time is over), we head indoors to get our identical treat bags.  I usually fill them with 10 identical items — one for each egg found. (Another Option:  The first year I numbered all the eggs and then gave them a number of specific treats based on the number, so they could practice number identification and one-to-one correspondence.  For example, #1 was one tiny notebook, #2 was two sharpened pencils, #3 was three small pages of stickers, and so on, but I found it difficult to continue each year.)

IMG_0292

More tips for a perfect egg hunt:

  1.  Have a basket of each color to match the eggs the children will find.
  2.  Start the hunt with one egg in each basket to help children remember which color they are searching for.
  3. Remind children of rules before hunting:  find only your color; do not pick up other colors; only help a friend if he/she wants help (remind them that we all like to find our own eggs)
  4. Once a few children have found their ten, ask the remaining children if they would like their friends help them find their eggs.  This provides help for younger children or those becoming frustrated.
  5. Recycled Materials Tip:  The same baskets (and most of the eggs) can be used each year.  A few children have asked to take home their eggs the last two years, so a few color sets had to be replaced.  Plastic eggs are readily available on sale after Easter, so why not?

Treat bag ideas (non-edible):

  • Wikki Stix (always a favorite or other crafty obect – individual play dough, set of crayons/markers)
  • writing object (sharpened pencils are my favorite – can be used right away)
  • small spiral notebook
  • cute figure of some type (duck, chick, animal)
  • cute holiday socks (inexpensive and useful to families)
  • themed stickers
  • reusable bag or container to hold items to bring home
  • card game or book
  • one parent-approved snack, such as organic fruit gummies or  crackers
  • one tiny chocolate bunny (because to me that says Easter)!

IMG_0239